|
CONTENTS
Introduction
Welcome to the Khalsa Search Me?
Placement Agency Application Version 1.0. This application is designed
to make the maintenance of client companies, their related job listings,
and applicants who have registered from the Web site a simple and
enjoyable process. It does this by providing a user friendly environment
which includes both an appealing graphical user interface as well
as easy to use functionality options. The application provides the
user quick access to records in the database allowing managing of
customer data in an efficient manner.
Chapter 1
Login
and Navigation
In this chapter you will learn how to:
- Open the application
- Login successfully into the application
- Navigate through the application
- Starting the Application
The Khalsa Search Me? Placement
Application can be started from the LoginFrame class found in the
"newSearchMeNE" package. This package is located in the
"JavaProjectPk" project folder. The following description
explains what to expect from the application.
- Logging In
Once the LoginFrame class is
executed the login screen appears. A Username and Password must
be entered and be acknowledged as legitimate by the application
before entry into the application is allowed.

If the <Cancel> button
on the Login screen is clicked, a message appears giving the
user the option to return to the Login screen or exit the program.
If the login is successful the
application main frame appears with a message box stating "Successful
Login" (Figure 1-2). At this time the Company Details form
loads and the application is ready to be used.

- Navigation
Navigation through the application
has been made easy through the use of the Application Home Frame
which gives access to three menus: File, View and Help.
|
Menu
|
Menu Items
|
Description
|
|
File
(Figure 2-1)
|
Exit
|
Exits the Search Me? Application
|
|
View (Figure 2-2)
|
Applicant
|
Opens the Applicant Details
form
|
|
Company
|
Opens the Company Details
form. Job Details form can be accessed from here
|
|
Skills
|
Opens the Skills Details
form
|
|
Help (Figure 2-3)
|
About
|
Gives a description of
the makers of the application, Khalsa Consulting
|
  
A user can only exit the application
through the file menu, and when the Exit item is selected the
user gets a message asking "Are you Sure you want to Exit"
(Figure 2-4). If the user chooses "Yes" the application
closes and the Login Frame appears again, if "No"
is selected the message will disappear and the user will remain
in the form they had open previously.

- Chapter Summary
In this chapter you learned how
to:
- Open the application
- Login successfully into the application
- Navigate through the application
BACK TO TOP
Chapter 2
Working
with Forms
In this chapter you will learn about:
- Basic layout of the forms
- Features that are similar in all the forms in
the application
- Basic Layout of Forms
There are four main forms in this
application:
- Company Details form
- Job Details form
- Applicant Details form
- Skills form
All four forms are very similar
in their layout and look which makes them easy to use. Once you
become familiar with using one of them then you can easily work
with them all.
Each of the forms has two list boxes
which hold data relevant to that form, for example the Company Details
form has the "Company List" and "Related Jobs"
list boxes. The "List of Companies" displays all of the
companies present in the database, while the "Related Jobs"
list displays jobs related to the company chosen in the other list
box. The text fields display details regarding the particular company.
All of the forms have a panel of
buttons (Figure 2-1) which provide the required functionality.
As displayed in Figure 2-1 the panel
of buttons provides basic functionality such as adding, deleting
and updating records. A detailed description of the buttons follows
(Table 2-1).
2.1 Chapter
Summary
In this chapter you learned about:
- Basic layout of the forms
- Features that are similar in all the forms in
the application
BACK TO TOP
Chapter
3
Company
Details Form
In this chapter you will learn how
to:
- View jobs related to a particular company
- Add new companies to the database and use the
Job Details form to enter jobs for the company
- Delete companies from the database
- Update company information
- Company Details Form
The Company Details form (Figure
3-1) is used to manage information relevant to a particular company.
This form is used to add a new company to database, delete an existing
company from the database, as well as to update an existing company’s
information.

This form can be accessed from the View Menu by choosing the "Company"
option, if it is not already selected.
Viewing
Related Jobs
Viewing related jobs for a company is a simple task.
- Scroll through the "Company List" to
find the company you are looking for.
- Highlight the company (any details regarding
the company will show up in the text fields to the left) and if
the company has any related jobs in the database then the jobs
will show up in the adjacent list box ("Related Jobs").
- Adding a New Company
To add a new company to the database
follow these steps:
 Click
the <New> button present on the panel of buttons. This clears
all the text fields. This also enables the <Add> and <Reset>
buttons that were previously disabled. Click
the <New> button present on the panel of buttons. This clears
all the text fields. This also enables the <Add> and <Reset>
buttons that were previously disabled.
 Enter
the relevant company information. Note: The "Notes"
text field is the only field that can be left blank. All other
text fields must be filled in with correct data; for example,
you cannot enter alphabetical values in the "Phone"
text field. Likewise, the "Name" field cannot contain
any numerical values. If you try to enter a numerical value and
try to save the record as such then you will get an error message. Enter
the relevant company information. Note: The "Notes"
text field is the only field that can be left blank. All other
text fields must be filled in with correct data; for example,
you cannot enter alphabetical values in the "Phone"
text field. Likewise, the "Name" field cannot contain
any numerical values. If you try to enter a numerical value and
try to save the record as such then you will get an error message.
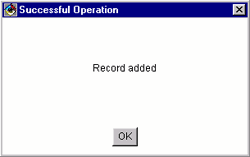
- Once you have finished entering all the relevant
information click the <Add> button. A message box confirming
that the record has been saved to the database will be displayed
(Figure 3-2).
 If you change your mind
and want to cancel the entry you are working on you can click
the <Reset> button which will not save the record to the
database and return the text fields to their previous values. If you change your mind
and want to cancel the entry you are working on you can click
the <Reset> button which will not save the record to the
database and return the text fields to their previous values.
- Adding a Job for
the Company
 If
you want to add a job for a particular company click the <Job
Form> button on the Company Details form. This will take you
to the Job Details form. To add a new job follow the following steps: If
you want to add a job for a particular company click the <Job
Form> button on the Company Details form. This will take you
to the Job Details form. To add a new job follow the following steps:
- Click the <New> button present on the panel
of buttons. This clears all the text fields. This also enables
the <Add> and <Reset> buttons that were previously
disabled.
- Enter the relevant job information. Note: The
"Notes" text field is the only field that can be left
blank. All other text fields must be filled in with correct data.
The date fields must be filled in using the YYYY/MM/DD format,
otherwise you will get an error. The fields related to salary
must contain only numerical data.
- Once you have finished entering all the relevant
information click the <Add> button. A message box confirming
that the record has been saved to the database will be displayed.
- If you change your mind and want to cancel the
entry you are working on you can click the <Reset> button
which will not save the record to the database and return the
text fields to their previous values.
- Deleting an Existing
Company
In order to delete a company the
jobs related to that company must be deleted first. To delete an
existing company from the database follow the steps below:
- Select the company to be deleted in the "Company
List" list box.
 Click
the <Delete> button. You will see a message box confirming
that the company has been deleted from the database. Click
the <Delete> button. You will see a message box confirming
that the company has been deleted from the database.
- Updating an Existing
Company
Updating the company information
is a simple process. Just follow the steps outlined below:
- Choose the company whose data you wish to update
from the list box.
 Make
the appropriate change in the text fields. Make
the appropriate change in the text fields.
- Click the <Update> button. A message box
will be displayed confirming that the record has been successfully
updated.
3.1 Chapter
Summary
|

|
Clears text fields so that a new record can
be added
|
|

|
Adds a record to the database
|
|

|
Deletes a record from the database
|
|

|
Updates a record in the database
|
|

|
Resets the text field values to the previous
record
|
|

|
Shows the Job Details form
|
In this chapter you learned how
to:
- View jobs related to particular company
- Add new companies to the database and use the
Job Details form to enter jobs for the company
- Delete companies from the database
- Update company information
BACK TO TOP
Chapter
4
Job Details
Form
In this chapter you will learn how
to:
- View skills related to a particular job
- Add a new job to the database and use the Choose
Skills form to enter required skills for the job
- Delete jobs from the database
- Update job information
4.0 Job
Details Form
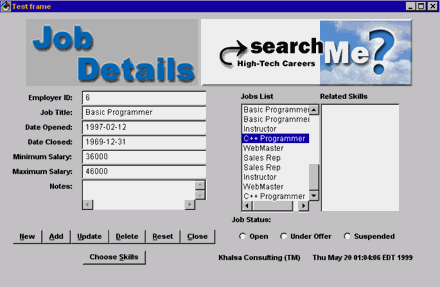

The function of the Job Details Form (Figure 4-1) is that it provides
an environment to add new jobs to the database related to a particular
company, displays relevant skills for a job, and allows you to modify
(add and delete) the skills required for a particular job. It is
important to note that the Job Details form can only be accessed
through the <Job Form> button present on the Company Details
form.
4.0.0 Viewing
Related Skills
Viewing related skills for a job is a simple task.
- Scroll through the "Jobs List" to find
the job you are looking for.
- Highlight the job (any details regarding the
job will show up in the text fields to the left) and if the job
has any related skills in the database then the skills will show
up in the adjacent list box ("Related Skills").
4.0.1 Adding
a New Job
To add a new job to the database
follow these steps:
 Click
the <New> button present on the panel of buttons. This clears
all the text fields. This also enables the <Add> and <Reset>
buttons that were previously disabled. Click
the <New> button present on the panel of buttons. This clears
all the text fields. This also enables the <Add> and <Reset>
buttons that were previously disabled.
- Enter the relevant job information. Note: The
"Notes" text field is the only field that can be left
blank. All other text fields must be filled in with correct data.
The date fields must be filled in using the YYYY/MM/DD format,
otherwise you will get an error. The fields related to salary
must contain only numerical data.
- For the job status field choose the appropriate
option.
 Once
you have finished entering all the relevant information click
the <Add> button. A message box confirming that the record
has been saved to the database will be displayed. Once
you have finished entering all the relevant information click
the <Add> button. A message box confirming that the record
has been saved to the database will be displayed.
 If
you change your mind and want to cancel the entry you are working
on you can click the <Reset> button which will not save
the record to the database and return the text fields to their
previous values. If
you change your mind and want to cancel the entry you are working
on you can click the <Reset> button which will not save
the record to the database and return the text fields to their
previous values.
4.0.2 Choosing
Skills for a Job
Once you have added a new job to
the database you must choose appropriate skills for that particular
job. In order to choose skills you need to follow the steps outlined
below:
- Once you have added the job to the database,
highlight the job in the "Jobs List" list box.


Click the <Choose Skills> button on the form. The "Choose
Skills" form will appear (Figure 4-2). There are two list
boxes on this form, "List of Skills" and "Selected
Skills". The "List of Skills" list box contains
all the skills present in the database, whereas the "Selected
Skills" list box will hold the skills that you select for
a particular job.
  Highlight
the skill for the job and click on the <Forward> button.
This will add the skill to the "Selected Skills" list
box. Repeat this step if you wish to add more then one skill. Highlight
the skill for the job and click on the <Forward> button.
This will add the skill to the "Selected Skills" list
box. Repeat this step if you wish to add more then one skill.
- If you would like to remove a skill that you
selected you can highlight the skill in the "Selected Skills"
list box and click the <Backward> button.
 Once
you have selected all the required skills for the job click the
<OK> button. This will take you back to the Job Details
form and the list of skills you just selected for the job will
be displayed in the "Related Skills" list box. Once
you have selected all the required skills for the job click the
<OK> button. This will take you back to the Job Details
form and the list of skills you just selected for the job will
be displayed in the "Related Skills" list box.
4.0.3 Deleting
an Existing Job
In order to delete a job follow
the steps below:
- Select the job to be deleted in the "Jobs
List" list box.
 Click
the <Delete> button. You will see a message box confirming
that the job has been deleted from the database. Click
the <Delete> button. You will see a message box confirming
that the job has been deleted from the database.
4.0.4 Updating
an Existing Job
Updating the job information is
a simple process. Just follow the steps outlined below:
- Choose the job whose data you wish to update
from the list box.
 Make
the appropriate change in the text fields or to the job status
options. Make
the appropriate change in the text fields or to the job status
options.
- Click the <Update> button. A message box
will be displayed confirming that the record has been successfully
updated.
4.1 Chapter
Summary
|

|
Clears text fields so that a new record can
be added
|
|

|
Adds a record to the database
|
|

|
Deletes a record from the database
|
|

|
Updates a record in the database
|
|

|
Resets the text field values to the previous
record
|
|

|
Shows the Choose Skills form
|
|

|
Forward button allows you to select skills
from the "Skills List"
|
|

|
Backward button allows you to remove skills
for a particular job
|
In this chapter you learned how
to:
- View skills related to a particular job
- Add a new job to the database and use the Choose
Skills form to enter required skills for the job
- Delete jobs from the database
- Update job information
BACK TO TOP
Chapter
5
Skill
& Applicants Form
In this chapter you will learn how
to:
- View applicants that possess a particular skill
- Add a new skill to the database
- Delete a skill from the database
- Update a skill
5.1 Skills
& Applicants Form
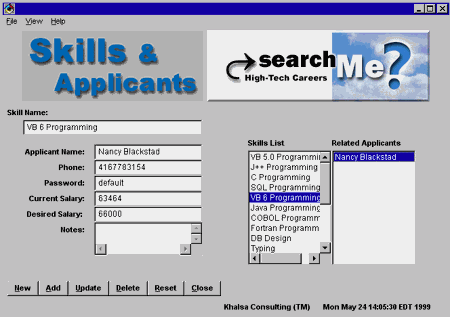
The Skills & Applicants form
(Figure 5-1) serves several purposes. It is used to add new skills
to the database, delete existing skills from the database and update
skills. The form is also used to view applicants that possess a
particular skill and their details.
The form can be accessed from the
View Menu by selecting the "Skills" option.
5.0.0 Viewing
Related Applicants
To view applicants that have a particular skill
follow the steps below:
- Scroll through the "Skills List" to
find the job you are looking for.
- Highlight the skill and if the skill has any
related applicants in the database then the applicants will show
up in the adjacent list box ("Related Applicants").
If you highlight the applicant then their details will appear
in the text fields.
5.0.1 Adding
a New Skill
To add a new skill to the database
follow these steps:
 Click
the <New> button present on the panel of buttons. This clears
the "Skill Name" text field. This also enables the <Add>
and <Reset> buttons which were previously disabled. Click
the <New> button present on the panel of buttons. This clears
the "Skill Name" text field. This also enables the <Add>
and <Reset> buttons which were previously disabled.
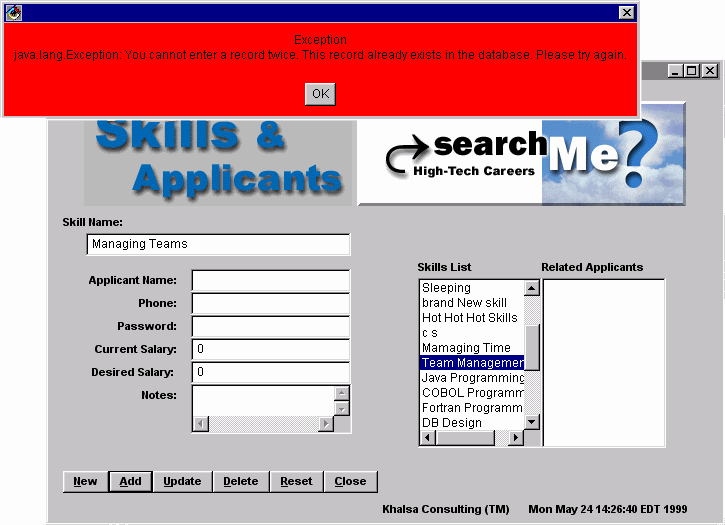
- Enter the skill name. If you leave the field
blank you will receive an error message. Note: If you enter
the same skill twice, even if similar wording is used, you will
receive a message box stating that the skill is already present
in the database. For example if you already have a skill named
Team Management then you cannot enter another skill name similar
to Team Management, therefore you cannot enter Managing Teams
(Figure 5-2) otherwise you will get an error.
 Once
you have finished entering the information click the <Add>
button. A message box confirming that the record has been saved
to the database will be displayed. Once
you have finished entering the information click the <Add>
button. A message box confirming that the record has been saved
to the database will be displayed.
 If
you change your mind and want to cancel the entry you are working
on you can click the <Reset> button which will not save
the record to the database and return the text fields to their
previous values. If
you change your mind and want to cancel the entry you are working
on you can click the <Reset> button which will not save
the record to the database and return the text fields to their
previous values.
5.0.2 Deleting
an Existing Skill
In order to delete a skill follow
the steps below:
- Select the skill to be deleted in the "Skills
List" list box.
 Click
the <Delete> button. You will see a message box confirming
that the skill has been deleted from the database. Click
the <Delete> button. You will see a message box confirming
that the skill has been deleted from the database.
5.0.3 Updating
an Existing Skill
Updating the skill information is
a simple process. Just follow the steps outlined below:
- Choose the skill that you wish to update from
the list box.
- Make the appropriate change in the text fields.
 Click
the <Update> button. A message box will be displayed confirming
that the record has been successfully updated. Click
the <Update> button. A message box will be displayed confirming
that the record has been successfully updated.
5.1 Chapter
Summary
|

|
Clears text fields so that a new record can
be added
|
|

|
Adds a record to the database
|
|

|
Deletes a record from the database
|
|

|
Updates a record in the database
|
|

|
Resets the text field values to the previous
record
|
In this chapter you learned how
to:
- View applicants that possess a particular skill
- Add a new skill to the database
- Delete a skill from the database
- Update a skill
BACK TO TOP
Chapter 6
Applicant
Details Form
In this chapter you will learn how
to:
- View skills related to a particular applicant
- Add new applicants to the database and use the
Choose Skill form to select skills for the applicant
- Delete applicants from the database
- Update applicant information
6.0 Applicant
Details Form
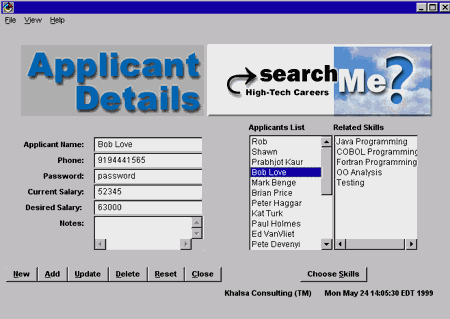
The Applicant Details Form (Figure
6-1) provides an environment to add new applicants to the database.
It also displays relevant skills for an applicant, allows you to
delete particular applicants as well as update applicant information.
This form can be accessed through
the View Menu by clicking the "Applicant" option.
6.0.0 Viewing
Related Skills
Viewing related skills for an applicant is a simple
task.
- Scroll through the "Applicants List"
to find the applicant you are looking for.
- Highlight the applicant (any details regarding
the applicant will show up in the text fields to the left) and
the skills related to the applicant will show up in the adjacent
list box ("Related Skills").
6.0.1 Adding
a New Applicant
To add a new applicant to the database
follow these steps:
 Click
the <New> button present on the panel of buttons. This clears
all the text fields. This also enables the <Add> and <Reset>
buttons which were previously disabled. Click
the <New> button present on the panel of buttons. This clears
all the text fields. This also enables the <Add> and <Reset>
buttons which were previously disabled.
- Enter the relevant applicant information. Note:
The "Notes" text field is the only field that can be
left blank. All other text fields must be filled in with correct
data. The phone field must be filled in using numerical data and
must contain nine digits, otherwise you will get an error. The
fields related to salary must contain only numerical data.
 Once
you have finished entering all the relevant information click
the <Add> button. A message box confirming that the record
has been saved to the database will be displayed. Once
you have finished entering all the relevant information click
the <Add> button. A message box confirming that the record
has been saved to the database will be displayed.
 If
you change your mind and want to cancel the entry you are working
on you can click the <Reset> button which will not save
the record to the database and return the text fields to their
previous values. If
you change your mind and want to cancel the entry you are working
on you can click the <Reset> button which will not save
the record to the database and return the text fields to their
previous values.
6.0.2 Choosing
Skills for an Applicant
Once you have added a new applicant
to the database you must choose appropriate skills for that particular
applicant. In order to choose skills you need to follow the steps
outlined below:
- Once you have added the applicant to the database,
highlight the applicant in the "Applicant s List" list
box.
 Click
the <Choose Skills> button on the form. The "Choose
Skills" form will appear (Figure 4-2). There are two list
boxes on this form, "Skills List" and "Selected
Skills". The "Skills List" list box contains all
the skills present in the database, whereas the "Selected
Skills" list box will hold the skills that you select for
a particular job. Click
the <Choose Skills> button on the form. The "Choose
Skills" form will appear (Figure 4-2). There are two list
boxes on this form, "Skills List" and "Selected
Skills". The "Skills List" list box contains all
the skills present in the database, whereas the "Selected
Skills" list box will hold the skills that you select for
a particular job.
  Highlight
the skill for the applicant and click on the <Forward> button.
This will add the skill to the "Selected Skills" list
box. Repeat this step if you wish to add more then one skill. Highlight
the skill for the applicant and click on the <Forward> button.
This will add the skill to the "Selected Skills" list
box. Repeat this step if you wish to add more then one skill.
- If you would like to remove a skill that you
selected you can highlight the skill in the "Selected Skills"
list box and click the <Backward> button.
 Once
you have selected all the required skills for the applicant click
the <OK> button. This will take you back to the Applicant
Details form and the list of skills you just selected for the
applicant will be displayed in the "Related Skills"
list box. Once
you have selected all the required skills for the applicant click
the <OK> button. This will take you back to the Applicant
Details form and the list of skills you just selected for the
applicant will be displayed in the "Related Skills"
list box.
6.0.3 Deleting
an Existing Applicant
In order to delete an applicant
follow the steps below:
- Select the applicant to be deleted in the "Applicant
s List" list box.
 Click
the <Delete> button. You will see a message box confirming
that the applicant has been deleted from the database. Click
the <Delete> button. You will see a message box confirming
that the applicant has been deleted from the database.
6.0.4 Updating
an Existing Applicant
Updating the applicant information
is a simple process. Just follow the steps outlined below:
- Choose the applicant whose data you wish to update
from the list box.
 Make
the appropriate change in the text fields. Make
the appropriate change in the text fields.
- Click the <Update> button. A message box
will be displayed confirming that the record has been successfully
updated.
6.1 Chapter
Summary
|

|
Clears text fields so that a new record can
be added
|
|

|
Adds a record to the database
|
|

|
Deletes a record from the database
|
|

|
Updates a record in the database
|
|

|
Resets the text field values to the previous
record
|
|

|
Shows the Choose Skills form
|
|

|
Forward button allows you to select skills
from the "Skills List"
|
|

|
Backward button allows you to remove skills
for a particular applicant
|
In this chapter you will learned
how to:
- View skills related to a particular applicant
- Add a new applicant to the database and use the
Choose Skills form to enter skills for the applicant
- Delete applicants from the database
- Update applicant information
BACK TO TOP
About
Khalsa Consulting
The Khalsa Search Me? Placement Agency
Application Version 1.0 is designed and created by Khalsa Consulting.
We are an international firm with offices all over the world. The
founding members of this firm are Nasser Eldeeb, Palvinder Kaur,
Shawn Lawson, Robert LeBlanc, Daniel Mitar and Jeff Tjan.
Technical support is provided for
this application by our experience customer service staff who can
be reached at (888) 5-KHALSA or you can visit us at www.khalsa.com!
BACK TO TOP

ITI CURRICULUM | FUNDAMENTALS
| VISUAL BASIC | NETWORKING
| JAVA |
ORACLE | WEB SITES |
ARTWORK | CONTACT
ME
|


